目录
Self drilling soil nails have become a preferred solution in modern geotechnical engineering due to their efficiency in stabilizing slopes, retaining walls, and other soil structures. Their integrated design, combining drilling, grouting, and anchoring in a single process, simplifies installation and enhances structural integrity. However, to fully realize their benefits, correct installation techniques are critical. This guide details how to install self drilling soil nails properly, highlighting key steps, common challenges, and professional insights.
Why Proper Installation of Self Drilling Soil Nails Matters
Improper installation can compromise the performance of self drilling soil nails, leading to reduced load-bearing capacity and potential safety hazards. Studies from the Geotechnical Engineering Journal reveal that poorly installed soil nails contribute to up to 15% of slope failures in certain regions. This underscores the importance of following industry standards and best practices during installation.
Preparing for Self Drilling Soil Nail Installation
1. Site Investigation and Design Verification
Before installation begins, a thorough site investigation is essential. This includes:
- Soil Type Analysis: Determining whether the soil is cohesive, granular, or mixed, as this influences drilling parameters.
- Groundwater Conditions: High water tables may require additional measures to prevent grout dilution.
- Load Requirements: Calculating nail length, diameter, and spacing to achieve the desired reinforcement strength.
Professional engineers typically recommend a minimum overlap of 1.5 meters for adjacent nails to ensure uniform support across the structure.
2. Equipment and Material Preparation
Ensure that the correct equipment and materials are on-site:
- Drilling Rigs: Capable of handling both rotary and percussive drilling, depending on ground hardness.
- Hollow Bar Soil Nails: Selected based on project specifications.
- Grout Mix: Typically a water-cement ratio of 4 to 0.6to balance workability and strength.
Step-by-Step Installation of Self Drilling Soil Nails
1. Positioning and Alignment
Mark nail locations precisely using engineering drawings. Incorrect alignment can lead to inadequate anchorage or overlap issues.
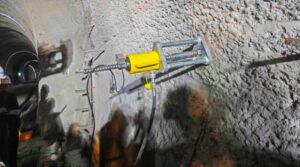
2. Drilling and Grouting Simultaneously
A defining feature of self drilling soil nails is their ability to drill and grout in a single operation:
- The hollow bar acts as the drill rod while grout is pumped through it under pressure.
- Maintain a grout pressure between 5 MPa and 1.0 MPato ensure proper filling of voids and fissures.
This process stabilizes the borehole immediately, reducing the risk of collapse in loose soils.
3. Installation of Plates and Nuts
Once the required depth is reached and grout has sufficiently set, anchor plates and nuts are installed:
- Torque levels must be checked to ensure proper tensioning of the system.
- Avoid over-tightening, which can damage the grout bond and reduce effectiveness.
Common Mistakes to Avoid During Installation
- Using Dry Grout Mixes: Can result in poor bonding and voids within the soil structure.
- Incorrect Drill Angles: Deviations greater than 5 degreesfrom the designed angle may compromise nail performance.
- Inadequate Flushing: Failure to clear debris during drilling can block grout flow, leading to incomplete anchoring.
Advantages of Self Drilling Soil Nails Over Traditional Nails
Unlike conventional soil nails, self drilling soil nails eliminate the need for pre-drilling and casing in unstable ground. This offers several advantages:
- Faster installation time—reducing labor costs by up to 30%.
- Effective in difficult ground conditions such as gravel, cobbles, and loose soils.
- Minimizes the risk of borehole collapse due to immediate grouting.
These benefits make them particularly suitable for projects with tight timelines or challenging geotechnical profiles.
Quality Control and Post-Installation Testing
After installation, quality assurance measures are critical:
- Pull-Out Tests: Verify load capacity and bonding strength of a random sample of soil nails.
- Visual Inspections: Check for grout seepage or alignment deviations.
- Monitoring Systems: In high-risk areas, consider installing inclinometers or load cells to track performance over time.
The International Society for Soil Mechanics recommends testing at least 5% of installed nails for large-scale projects.
Conclusion
Installing self drilling soil nails correctly is vital for ensuring the stability and longevity of soil reinforcement systems. From precise site preparation to careful drilling, grouting, and tensioning, each step requires attention to detail and adherence to engineering best practices. By following proper procedures, contractors can achieve superior results, even in complex ground conditions.
0